You can configure user-defined properties for technical assets. First, you need to set up a form and then use it to configure user-defined extended properties.
You can configure extended properties of technical assets in the following ways:
Configure Extended Properties Globally
At the system level, you can configure extended properties for environments, tables, and columns. Extended properties configured at the system level for these objects apply to the objects under the system. For example, extended properties configured at system level for environments apply to all environments under that system.
To configure extended properties at system level, follow these steps:
- Go to Application Menu > Data Catalog > Metadata Manager > Explore.
- In the Asset Catalog pane, hover over a system and click
 to view system details.
 - Click the Configure Extended Properties tab.
- Field Controls: Use this pane to get the required UI elements.
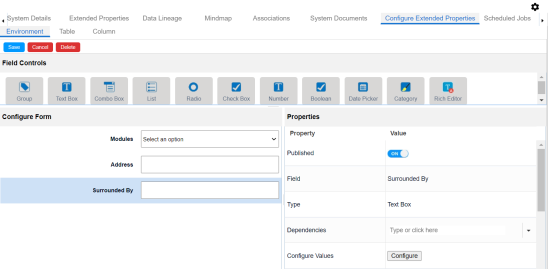
- Configure Form: Use this pane to design forms using the UI elements available in the Field Controls pane.
- Properties: Use this pane to view the properties of the UI element selected in the Configure Form pane.
- Use the following tabs:
- Environment
- Use this tab to configure extended properties for environments under the selected system.
- Table
Use this tab to configure extended properties for tables under the selected system.
- Column
Use this tab to configure extended properties for columns under the selected system.
- On these tabs, click Edit.
- Double-click or drag and drop the required UI elements from the Field Controls pane to the Configure Form pane.
- Select UI elements, one at a time, and configure their properties in the Properties pane.
- Default connector: Use this option to enter option values manually or using an XLSX file.
- Reference Data Manager: Use this option to pull option values from reference tables in the Reference Data Manager.
- Filter feature supports field types such drop-down, list, checkbox, radio, and boolean.
- Switch the Include Extended Properties option ON on the Discover Asset Settings page.
- Schedule a synchronization job or manually synchronize the asset before you can filter assets on the Discover Assets module.
- Click Save.
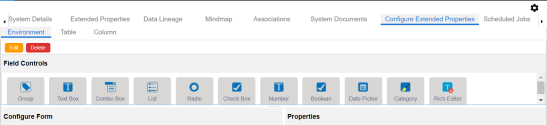
The Configure Extended Properties tab contains the following sections:
The available properties differ based on the type of UI element.
Refer to the following table for property descriptions:
|
Property |
Description |
|---|---|
|
Published |
Switch Published to ON to publish the field. |
|
Field |
Specifies the field label. To change the field labels, double-click the corresponding Value cell. For example, Metadata Scanned On. |
|
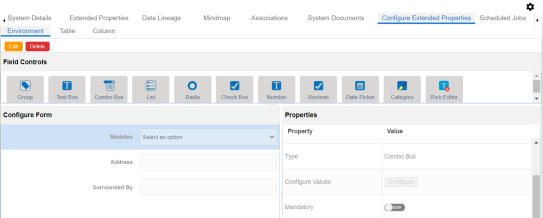
Type |
Specifies the type of the field. To select field types, double-click the corresponding Value cell. |
|
Dependencies |
Defines the pick list fields that can be used as controlling fields. It works only with the Reference Data Manager connector. To define pick list fields, select the fields from the drop-down option. |
|
Configure Values |
Specifies the connectors for the field. To configure option values, click Configure Values. Use the following options: |
|
Mandatory |
Specifies whether the field is mandatory. |
|
Description |
Specifies the field description. To enter field descriptions, double-click the corresponding Value cell. |
|
Visible in Extended Properties |
Switch Visible in Extended Properties to ON to make the field visible on the Extended Properties tab. |
|
Use in Discover Assets |
Switch Use in Discover Assets to ON to use the field as a filter in the Discover Assets module. Ensure the following: |
|
Order |
Specifies the order of the field on the Extended Properties tab. To enter the order number, double-click the corresponding Value cell. You can also drag and move fields in the Configure Form pane to change their order. |
The form is saved and is available on the Extended Properties tab of the selected object (Environment, Table, or Column).
Similarly, you can also configure the extended properties form at environment, table, and column levels. Once you configure the form, you can set up extended property values on the Extended Properties tab at system level or individual asset levels.
To use the form, at system level or other (environment, table, or column) levels, follow these steps:
- In the Data Catalog pane, click the required object.
- Click the Extended Properties tab.
- Click Edit and set extended properties.
- Click Save.
The extended properties are saved.
You can download extended properties in the XLSX format and use it as a template to import extended properties. To download extended properties, click Export To Excel.
Configure Extended Properties for Individual Assets
You can also configure the extended properties for any individual technical asset.
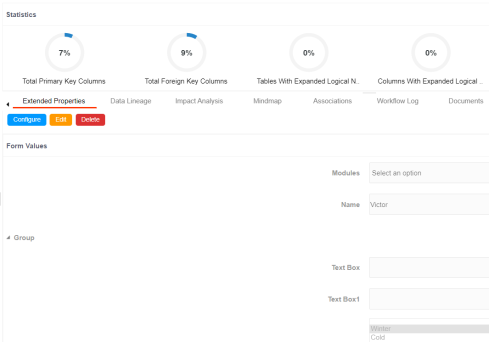
To configure the extended properties for an individual asset, select an asset from the Metadata Manager, and click the Extended Properties tab.
For example, the following image displays the Extended Properties tab for the selected environment. Similarly, you can configure the extended properties of individual assets such as systems, tables, and columns.
You can download extended properties in the XLSX format and use it as a template to import extended properties. To download extended properties, on the Extended Properties tab, click Export To Excel.
|
Copyright © 2026 Quest Software Inc. |